Documentation
Contents
Creating a CLiC plugin project's structure
As you may know, CLiC consists in a set of Eclipse plugins. Its extensibility relies on a common Eclipse mechanism called Extension Points, so in order to contribute new commands in CLiC, you'll have to develop some new Eclipse plugins.
The aim of this documentation isn't to explain how to develop Eclipse plugins, or how they should be organized, packaged, etc. But we'll assume that you actually never developed any kind of Eclipse plugins, and teach you all the steps to reach in order to contribute a new command in CLiC.
Actually, we'll rely for this on another project we contributed: clic-archetype. This project actually consists in a Maven archetype allowing to create the complete project structure to be used in order to develop your Eclipse plugin. Icing on the cake, all the default configuration to be used in order to package this plugin is already managed in the archetype, so you'll have something completely working out of the box.
0. Installing the archetype
First of all, you'll have to retrieve the archetype locally: git clone git@github.com:awltech/clic-archetype.git. Then, simply install this archetype in your local Maven repository: cd clic-archetype; mvn clean install.
1. Invoking the archetype
After this first step, you just need to invoke the archetype where you want to create the project (in your workspace, for example). Here's how to do it from a command-line: mvn archetype:create -DgroupId=com.sample -DartifactId=demo -Dversion=1.0 -DarchetypeGroupId=com.worldline.clic -DarchetypeArtifactId=clic-archetype
For sure, you'll have to replace the groupId, artifactId, and version values by those corresponding to your project.
If you don't want to type long command-lines, you can also use the interactive way of creating projects with Maven archetypes by simply typing mvn archetype:generate and then following the instructions on the screen. Basically, it'll ask you to type the number of the archetype which will be displayed in a list, and then give the required inputs in order to create the project.
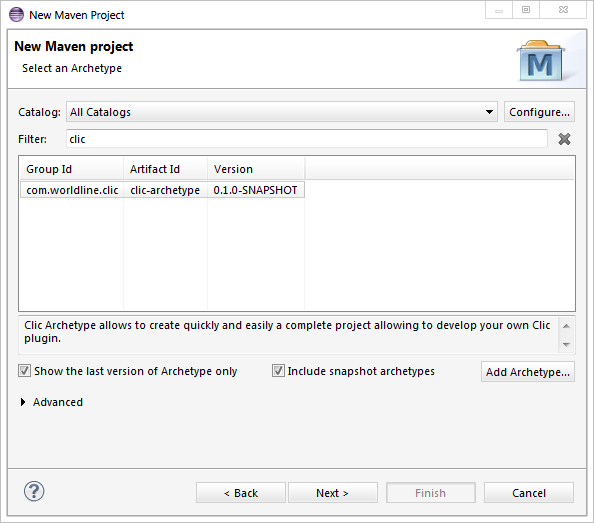
Finally, it's also possible to create the Maven project directly from Eclipse, as soon as you installed m2e plugins in your Eclipse instance. For this, simply go to File > New > Other... > Maven Project and select clic-archetype from the list which is displayed:
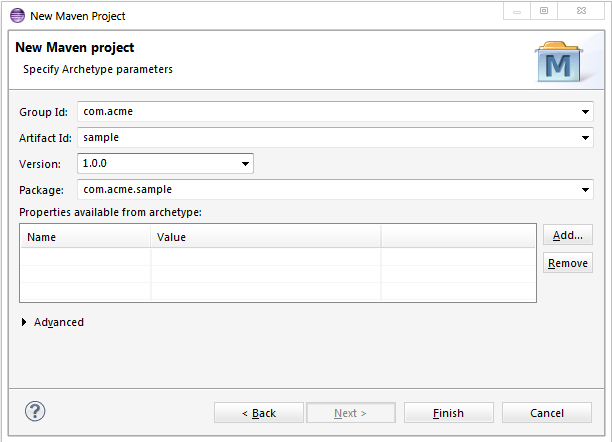
Then, simply fulfill the form asking for your project's references and click on Finish so your project will be created:
2. Already done!
That's all! At this point, you already created the whole project's structure, and an example of a command is provided in the archetype. In your Eclipse workspace, you'll have something like this created:
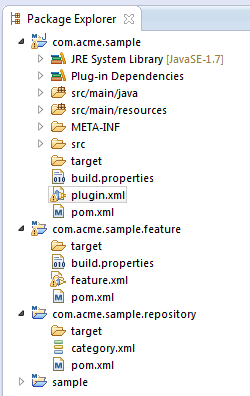
The only project you'll have to care about is the Eclipse plugin one (not containing feature or repository in its name). The other projects are created in order to deal with packaging purpose. In the next part of the documentation, we'll see together how to modify the example command, and how to contribute new commands in your plugin.
Registering a new command in CLiC
As presented before, your command is completely configured in the Eclise plugin which has been created. Actually, the plugin will contain the logical implementation of your command, while the registration to CLiC engine will be held by Eclipse's extension point mechanism. To do so, we'll have to complete the plugin.xml file. Here's the content of the example provided in the archetype in order to illustrate what's required:
As this snippet illustrates, we're using the com.worldline.clic.commands extension point. Using it, we can define as many commands as we want using this <command> tag. What's interesting is that we only need to provide 3 information for registering a command:
- an id, which is actually the keyword that will be used by CLiC in order to invoke your command (so if you want the user to be able to type
toto -some params, the id you should specify istoto). - a description which will be used in order to display some information and help about your command. Basically, it'll be used while invoking the
listandhelpcommands. - an implementation which is a reference to a class from your plugin containing the actual implementation of what your command does.
And that's all! Your command is now registered in CLiC and can be invoked as soon as someone will install your plugin! Nevertheless, please consider that the provided class should actually extend some internal class from CLiC, which will be illustrated in the next part of the documentation.
Please notice that it's also possible to define all of these information directly from Eclipse's plugin editor, which allows to have a graphical interface for this, and some hints about the values to be provided, as illustrated on this picture:
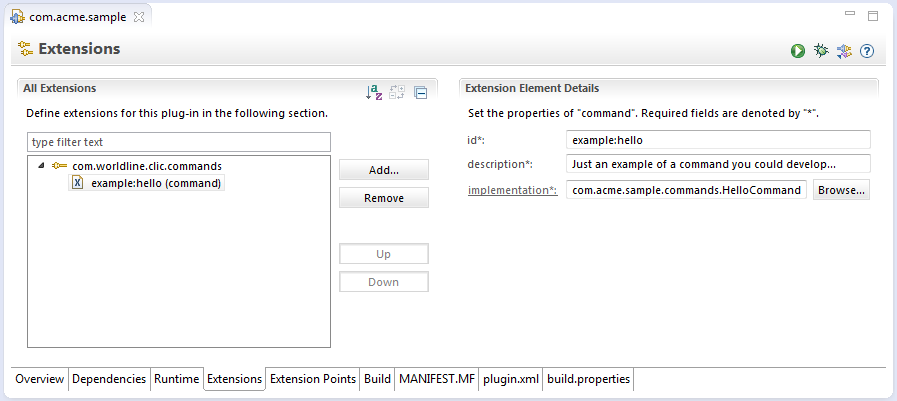
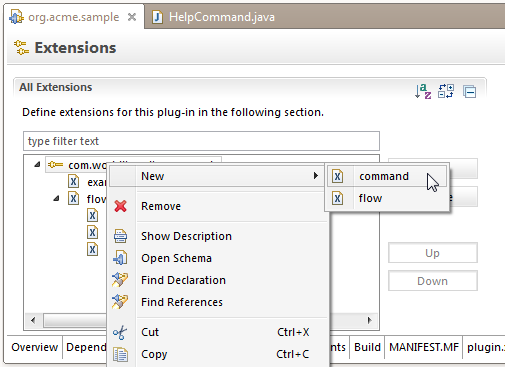
Using this editor, you can both specify to use the extension point by clicking on the Add... button, and selecting the extension point you'd like to use ; and also define new commands in the extension point by right clicking on it, allowing to get information on what's available for creation in CLiC:
Implementing your command
As presented in the previous part of the documentation, the only remaining part of integrating a new command is the actual implementation. You already know that you'll need to implement a specific class which is specified in the extension point, but let's have a look at the details.
Actually, your implementation should just extend the com.worldline.clic.commands.AbstractCommand provided by CLiC framework. This AbstractCommand being an abstract class, you'll have to implement two different methods in your own class in order to make it compile: configureParser() and execute(final CommandContext context). Let's have a closer look at both methods:
0. Configuring the parser
After defining your command, you'll have to specify all the parameters which are available for your command. For this, CLiC is internally relying on jopt-simple, a famous Java framework for command-line parsing. In this method, you have access to a joptsimple.OptionParser object named parser.
The goal of this configureParser() function is (obviously) to configure this parser object in order to define all the parameters and options that could be used by the command you're defining. For this, please have a look at this very detailed documentation of jopt-simple, which actually contains all the features you could use in order to define your parameters.
Please keep in mind that using jopt-simple, you'll be able to define some validation on the provided parameters, conversions in types you need, etc.
1. Implementing the logical behavior of your command
The second method you'll have to complete is the execute(final CommandContext context) method. It allows you to write the Java source code which will be executed while invoking your command. During the execution, you'll have access to two different important objects:
First of all, and in order to retrieve all the parameters which have been provided by the user, you'll be able to use a joptsimple.OptionSet object, named options which is computed by jopt-simple. You'll have information about how to use it from the same documentation of jopt-simple.
Then, you'll be able to use the com.worldline.clic.commands.CommandContext object which is provided as a parameter of the execute(final CommandContext context) method. Using this context, you'll be able to send feedbacks about the execution to the end user thanks to the context.write(String) method. Please take in consideration that the context can also be used in order to store some data that you'd like to send to some other location (the context actually contains some kind of a Map which allows you to store data as a key->value mechanism). But anyway, the most important thing you should use is this write(String) method allowing to write on the output console.
2. Example of an implementation
Just as a small illustration of a command implementation, here's the source code you'll find in the archetype as an example:
Packaging and sharing your plugin
Being an Eclipse plugin, your CLiC plugin will lead to some constraints in order to be packaged. Indeed you won't be able to create a simple jar in order to share it (or at least you could, but it won't be really effective), and you'll have to generate an Eclipse update site... But don't worry! The archetype already manages this for you.
In the archetype, we're providing a complete configuration of Tycho which allows to simply build Eclipse plugins from Maven. So the only thing you'll have to do is to execute from the root project of your plugin (which contains the plugin, feature and repository projects) this Maven command: mvn clean package. That's all.
After launching this simple Maven command, you can have a look at the target/ folder located in the repository project, which will contain the update site that you can deploy. Your update site will be present both as a zip file, and a folder named repository. You can now use this update site in order to install your plugin in Eclipse, and share it with your colleagues.
Defining an execution flow
From the Eclipse extension point provided by CLiC, you'll be able not only to define unitary commands, but also to define execution flows based on the commands which are available. In order to do so, you'll have to complete your plugin's extension point with some content linked to flows. Here's an example illustrating how it's supposed to work:
0. Defining the flow
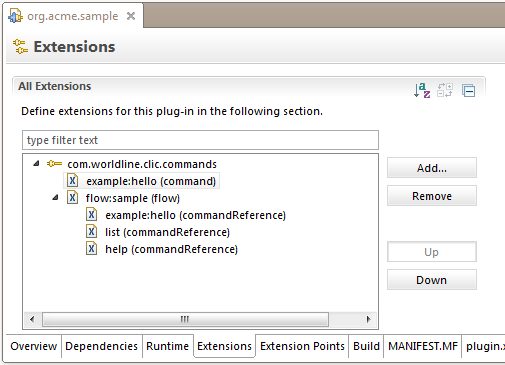
As you can see from this example, you can use the <flow> tag from the extension point in order to define a new flow. For this, you'll have to provide a name which will be used both for getting information about your flow, but also for invoking him. Then, your flow can contain as many commandReference elements as you need. A commandReference is actually only the name of the command you'd like to invoke. From the example below, it shows that the flow which has been defined will call successively the commands example:hello (which is defined in the exact same plugin), list, and help.
For sure, you can also use Eclipse's extension point editor in order to have a graphical interface allowing to manipulate those flows:
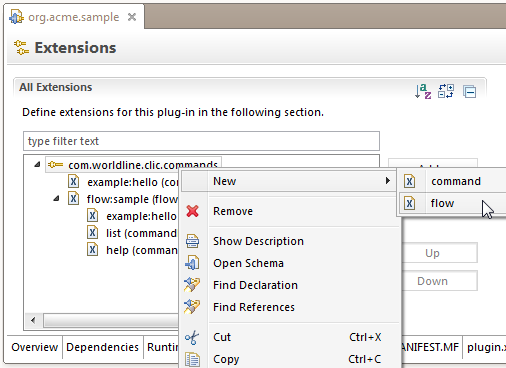
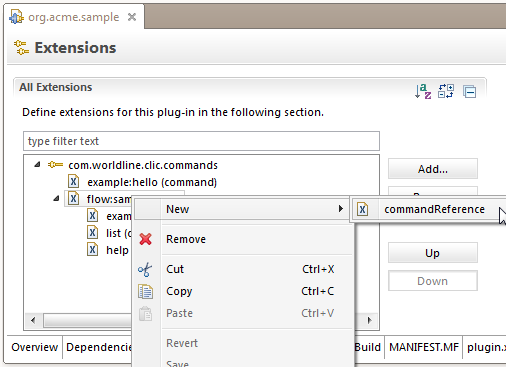
And the various elements can be created by right clicking on the nodes:
1. Using the flow
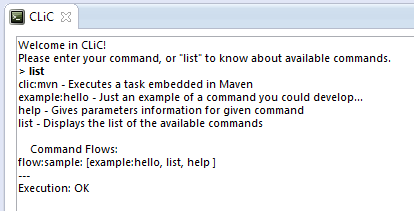
Once the plugin defining the flow installed in your Eclipse instance, you'll be able to invoke him directly from CLiC. In order to get information about the existing flows in your Eclipse instance, simply run the list command, and you'll get information about all the flows which are available.
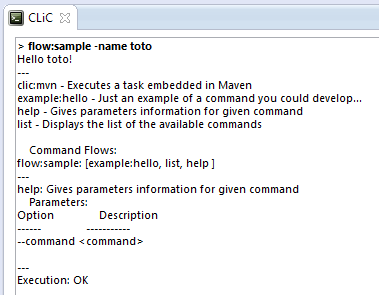
Then, you just have to type in the command line your flow's reference in order to execute it. Based on our example, I can simply execute flow:sample command to see the result:
2. Managing arguments
From the previous example, you may saw that passing parameters and arguments to flows is actually managed just like with unitary commands. While executing a flow, you can actually specify all the options that may be used by the associated commands so they can interpret the parameters and be executed properly.
Nevertheless, there's also another way of dealing with arguments, as it's possible to specify arguments for a command from a previously executed command! For this, you can simply specify outputs in your command, and they'll be sent as arguments for all the other commands. To do so, you can use the com.worldline.clic.commands.CommandContext.addOutput(String s) method. In our example, you can for example compute something from the provided name and sent it for another command:
From the example below, you can see that it's possible from the example:hello command to create a new argument which will be sent to all the other commands, and interpreted by the commands. So if you had another command for creating a project dedicated to a particular user for example, it could use this new generated parameter to get its information.
Invoking a command programmatically
From a command you defined, or in order to industrialize some already existing commands, you may need to invoke programmatically another command you may have built from your source code. In order to do so, you can simply use the com.worldline.clic.internal.commands.CommandInvoker object, which provides a static method called static IStatus invoke(final String commandChain, final CommandContext context).
Using this invoke method, you can ask the internal engine for executing another complete command, with parameters and so on. Please note that while using this method, this new command will be executed in the same thread as the parent command.
